How to edit products
In Bizzkit PIM, there are several methods available for editing products:
- Modifying data directly on the PDP (Product Details Page)
- Utilizing the Update Bulk Operation to make changes to products
- Employing mass edit functionality
- Leveraging import/export features for updates
- Accessing the API to edit product information
Here we will explore the first four options for editing products in Bizzkit PIM.
Please refer to Understanding Bizzkit PIM and the other articles in the documentation for more comprehensive information.
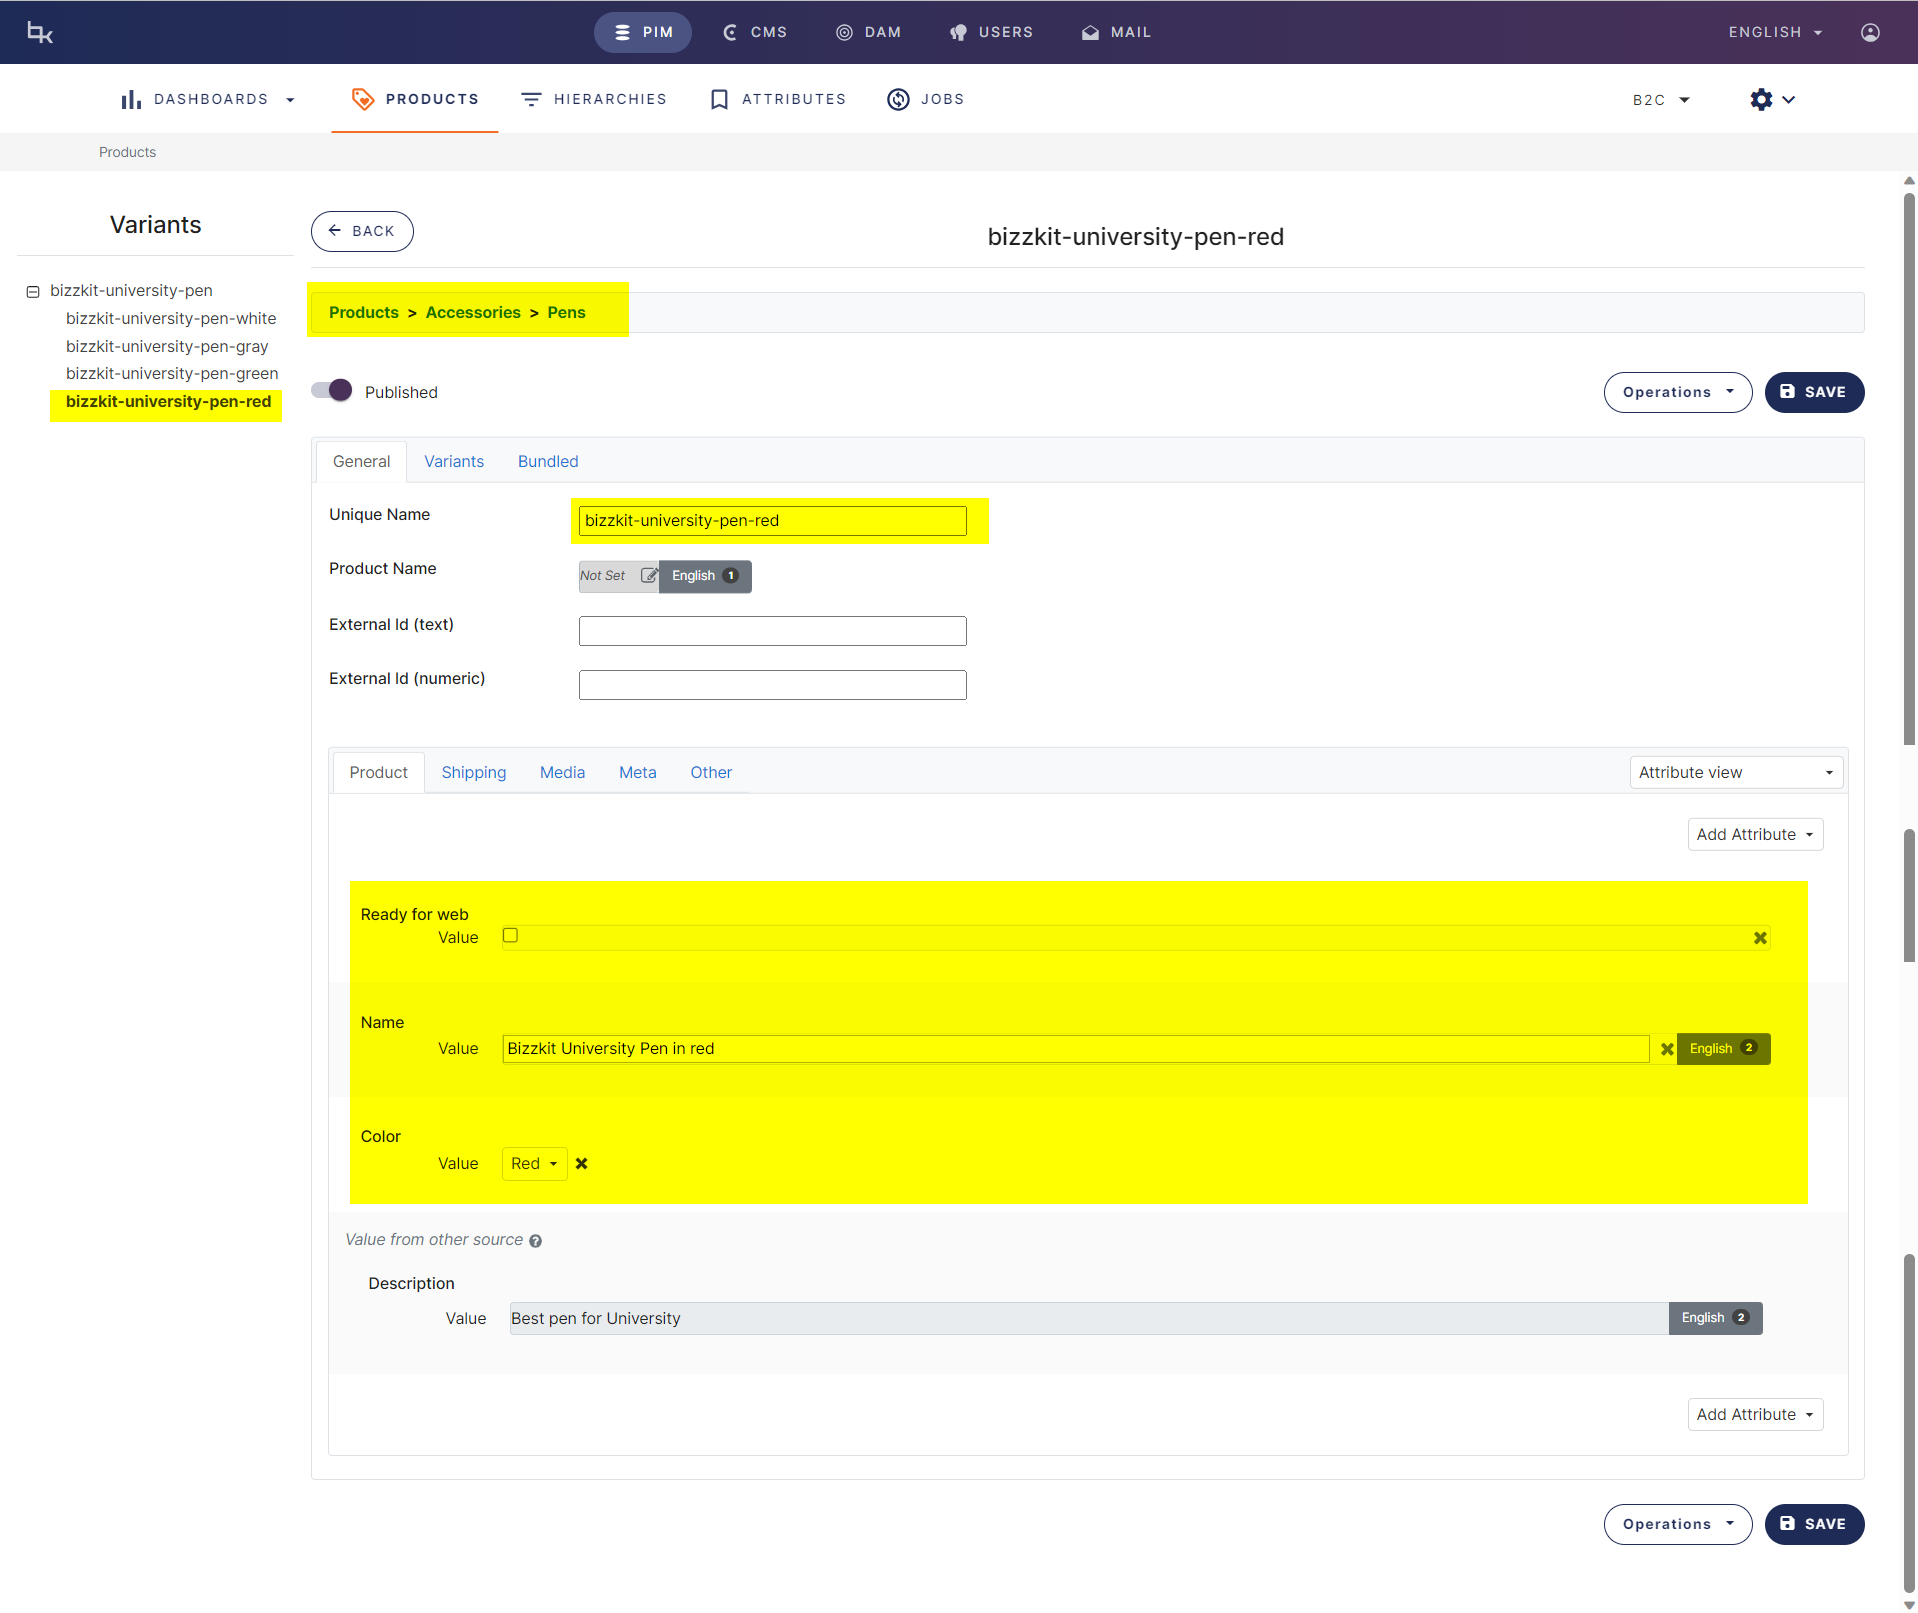
Modifying data directly on the PDP
Attributes represent data as values, and these attributes can be either single or multi-valued. They may also be segmented, meaning the data is divided into different categories such as language and channels. Additionally, data is stored in various datatypes. All types of attributes are supported on the PIM PDP.
Here is a step-by-step guide for editing various types of values. In this example, we will utilize Bizzkit Merchandise data to demonstrate the different options, including editing simple text, numbers and data, modifying segmented data (such as language), using multi value-attributes, employing AI for product descriptions, and more.
Follow these steps:
- To edit a simple datatype, simply change the data in the textbox, checkbox, datepicker, etc.
- To edit segmented data (such as language, channel, etc.), click the button to the right of the editor and select language, channel, etc.
- To add values to a multi-value attribute, click the add button to insert values and the "x" to delete data.
- To utilize AI for product descriptions, click the Generate button and select the size of text to generate.
Utilizing the Update Bulk Operation
If you have multiple products that you need to update, you can opt to use the Update Bulk Operation. In this process, you can select multiple products on the PLP (Products List Page) or utilize a predefined filter (possibly in conjunction with a search), and then execute the bulk operation. You have the option to add or update attributes before carrying out the bulk operation.
Info
When using a bulk operation, you may not see an immediate change on the PLP. This delay occurs because the job is handled by a so-called job runner, and the timing of the execution depends on how busy the PIM system is.
Here is a step-by-step guide for executing an Update Bulk Operation. In this example, we will use a filter and search to locate specific products, and then set the Ready for Web attribute to true.
Follow these steps:
- Find products by using a filter, searching or just select the products you need to update
- Click Operations and then click Choose an operation under "Selected" or "Current filters"
- Click on Update product
- Choose the Merge rule
- Add the attributes/values needed
- Click Next
- Check the products being affected
- Click Execute
Using Mass Edit
If you're looking to update several products, editing them individually can be inefficient. To address this, PIM introduces the "Mass Edit" feature. This tool lets users edit products collectively in a grid, determined by specific filter-defined fields. To utilize Mass Edit, simply select the desired products and adjust the PLP to encompass the attributes requiring modification. This can be achieved either manually or through the use of a filter.
Below is a detailed walkthrough on utilizing the Mass Edit feature. In this illustration, we'll employ a filter to pinpoint products requiring modifications and display columns with attributes that need adjustments. It's crucial to choose any segmentation prior to initiating the mass edit process.
Follow these steps:
- Use a filter to locate products.
- Add any necessary columns for editing.
- Adjust segmentation if required (e.g., culture).
- Click on the pen-icon located at the top right.
- Modify the data.
- Hint: Drag and drop to copy data from one field to others above or below.
- Hit the Save button.
Tip
Learn more about the capabilities of the mass edit feature in Bizzkit PIM, by reading the full feature documentation here.
Importing and Exporting Data
Bizzkit PIM offers users the flexibility to both export and import data via the CSV format. While we have detailed documentation for the specification here, it predominantly covers the API-based processes. Recognizing that not everyone interacts with the system the same way, this section will focus on the import/export functionalities tailored for the PIM UI users, shedding light on how to navigate through the UI.
Export data
There are various reasons to export data. One could be to integrate PIM data into other applications, while another might be to serve as a template for data modifications, which can later be re-imported.
From the UI you can export data directly from the PDP (Product Details Page) for a specific product or from the PLP (Product List Page) for a selection of products by clicking on the Operations. If you're on the PDP, it will lead you straight to the Export operation for that particular product. However, if you're on the PLP, you'll need to choose the Export Bulk Operation.
From this point, you have the option to choose which attributes to include in the export. Alternatively, you can pick an export specification that already has the necessary attributes predefined. These specifications can be managed and updated from the administration settings, accessible via the top right gear icon. You can also select what segmentations (if not all) to include in the export.
Below is a detailed walkthrough on how to choose specific products and export the desired attributes:
Follow these steps to export products:
- Use a filter or search function to locate products.
- Select the products you wish to export.
- Click on "Operations" and then select an operation from the list.
- Choose "Export Products."
- Add the required attributes by clicking the "+Add" button or select a predefined specification. You can maintain specifications from Settings->Administration->Import/Export specifications
- Optionally, you can select default values and segmentations to be included in the export.
- Click "Next."
- Wait for the export job to complete.
- Once completed, click the "Download" button to retrieve the CSV file.
Below is the CSV file exported from the example:
For easier reading, the data is also presented in the table below:
| UniqueName | ExternalIntId | PrimaryPlacementCategory | VariantOfMaster | $COLOR | NAME:Tda | NAME:Ten | READYFORWEB |
|---|---|---|---|---|---|---|---|
| bizzkit-university-pen-white | 58252 | PENS | bizzkit-university-pen | WHITE | Bizzkit University Kuglepen Hvid | Bizzkit University Pen White | True |
| bizzkit-university-pen-green | 27226 | PENS | bizzkit-university-pen | GREEN | Bizzkit University Kuglepen Grøn | Bizzkit University Pen Green | True |
| bizzkit-university-pen-gray | 98986 | PENS | bizzkit-university-pen | GRAY | Bizzkit University Kuglepen Grå | Bizzkit University Pen Gray | True |
Observe the headers, which include the columns:
- UniqueName
- ExternalIntId
- PrimaryPlacementCategory
- VariantOfMaster
- COLOR
- NAME:Tda
- NAME:Ten
- READYFORWEB
Here's a brief description of each column:
- UniqueName: Represents the product ID.
- ExternalIntId: Refers to the external ID (it may not always be in use).
- PrimaryPlacementCategory: Denotes the primary hierarchical placement.
- VariantOfMaster: Indicates the master product, if there is one.
- The remaining attributes are those selected in the example. Note the syntax for segmented values and color (which refers to a global list). For example, ":Tda" represents a translation segmented attribute in the Danish dimension, and $COLOR refers to the key of a specific item in a global list.
For a more detailed explanation of these columns, you can refer to the specification here.
Import data
To import products, ensure you follow the designated format specification. This approach allows you to take advantage of previously exported products as blueprints, making it easier to modify or append values using tools like Excel. You're free to decide which columns to incorporate in your import. If there are specific attributes you'd prefer to remain unchanged, simply assign them the NULL value. For a comprehensive understanding, consult the specification. It's crucial to remember that imports via the UI always default to Merge-mode.
Here's a sample content from a CSV file tailored for importing data into two pre-existing products:
Here the same data in a table:
| UniqueName | NAME:Tda | NAME:Ten | READYFORWEB |
|---|---|---|---|
| bizzkit-university-pen-white | Bizzkit University Kuglepen i farven hvid | Bizzkit University Pen in white | NULL |
| bizzkit-university-pen-green | Bizzkit University Kuglepen i farven grøn | Bizzkit University Pen in green | false |
Note the use of NULL (bizzkit-university-pen-white will keep its READYFORWEB value unchanged).
Below is a detailed walkthrough on how to import values through the UI:
Follow these steps to export products:
- Click on "Products" in the top-level menu to open the PDP.
- Click on the upload icon located to the right of the "Operations" button.
- Click on "Choose file."
- Select the file you wish to upload.
- Wait for the export job to finish.
Create products through import
Please note you can not only update data but also create new product. By design PIM will create products if the product id is not found. Here is an example of create a new pen:
Here is the same data as a table
| UniqueName | PrimaryPlacementCategory | VariantOfMaster | NAME:Tda | NAME:Ten | READYFORWEB | $COLOR |
|---|---|---|---|---|---|---|
| bizzkit-university-pen-red | PENS | bizzkit-university-pen | Bizzkit University Kuglepen i farven rød | Bizzkit University Pen in red | false | RED |
Importing a file with this content will create the bizzkit-university-pen-red product with the specified attributes.